An ordinary user periodically faces the tasks of bypassing geo-blocking, changing their IP address for some reason or safely surfing the Internet, in general, with proxy settings.
As an option, sort through and search for proxy addresses manually, test them for relevance. However, spending a lot of time on routine actions, and even with dubious results — inefficient.
Fortunately, there is Proxy Switcher, which solves not only basic queries (anonymity, security, blocking bypass), but also allows you to automate the search for working proxies.
We list the advantages of Proxy Switcher:
- Simple and intuitive interface;
- Automatic search, verification and selection of proxies by relevance;
- Provision of protocols: HTTP, SOCKS, Elite;
- Support for working with different browsers;
- Authenticated proxy sessions;
- Reliable bypass blocking sites;
- High level of confidentiality;
- Simulation of multiple IP addresses;
- Parallel sessions from multiple accounts at the same time;
- Connection to services with streaming information: audio or video.
There are 2 basic versions of Proxy Switcher:
- standard;
- Pro.
It remains to explain step by step how the Proxy Switcher program is installed on a computer and how it is used to configure a proxy.
Proxy Switcher, installation and basic configuration steps
Step one
First you need to download Proxy Switcher on your computer. After installing the program, a launch shortcut will appear in the lower right corner of the Taskbar, click on it.
In the Preliminary settings window, uncheck the box in front of the "Show Wizard on Startup" line, otherwise the setup wizard will be activated every time you start the Proxy Switcher. Then click "Next".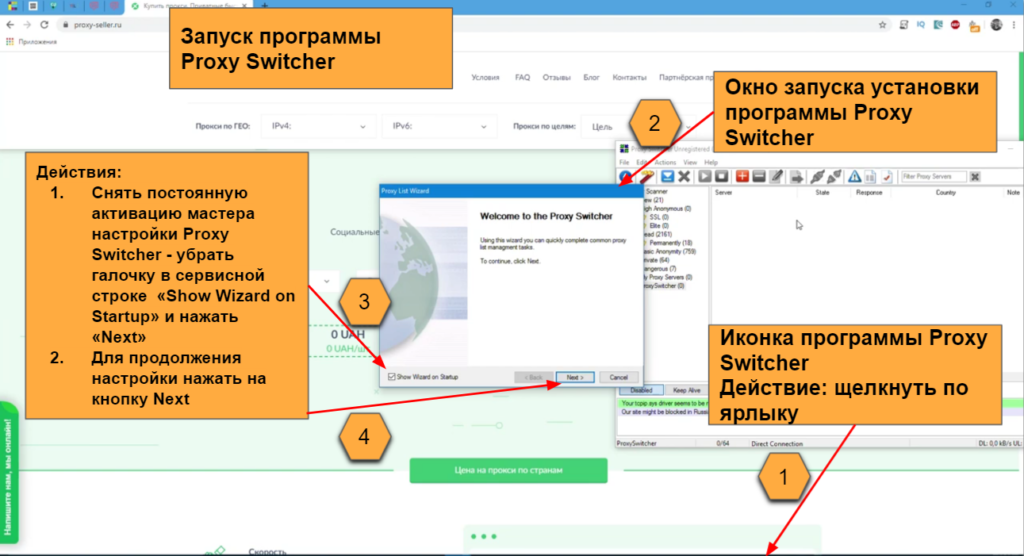
step two
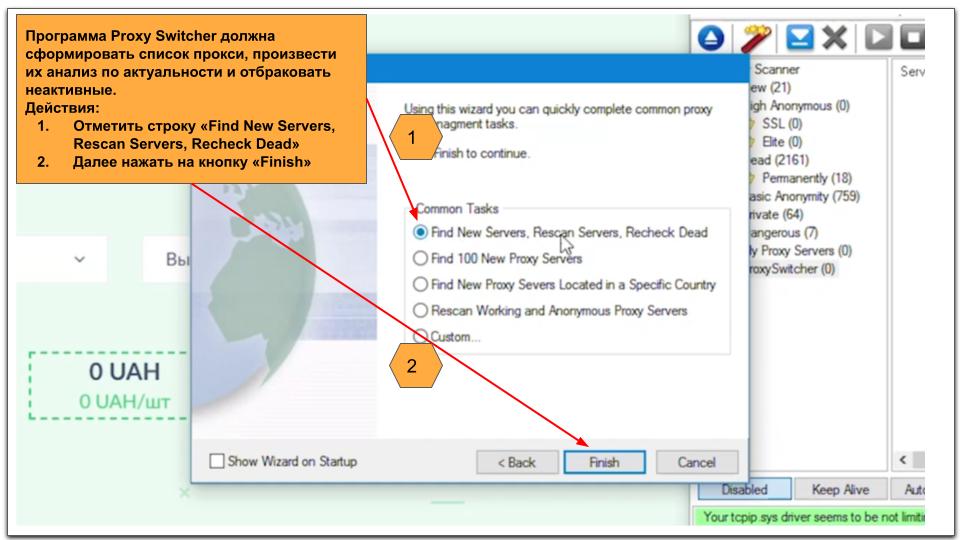
In the Preconfiguration dialog box, mark the first line "Find New Servers, Rescan Servers, Recheck Dead" with a marker. This will force the application to start searching for proxies, sort them by relevance, and reject those that are inactive. Next is the Finish button.
Step Three
Consider the application workspace.
At the top is the navigation bar of the Main Menu, below it is the Toolbar. The sidebar (on the left) contains working folders with categories of proxy servers: new, enhanced privacy, obsolete, and so on.
central part — this is a list of proxy servers with verification status, country of location. In the footer of the Workspace, at the bottom left, there is a diagram of proxy downloads.
When you first start Proxy Switcher, it starts downloading a list of proxies for further verification. As a rule, it takes more than 1 hour. In the future, this time is reduced.
Manual mode for unloading the proxy list, path: Main menu — item "Actions" (Actions) — command "Download Proxy Lists" (Download proxy list).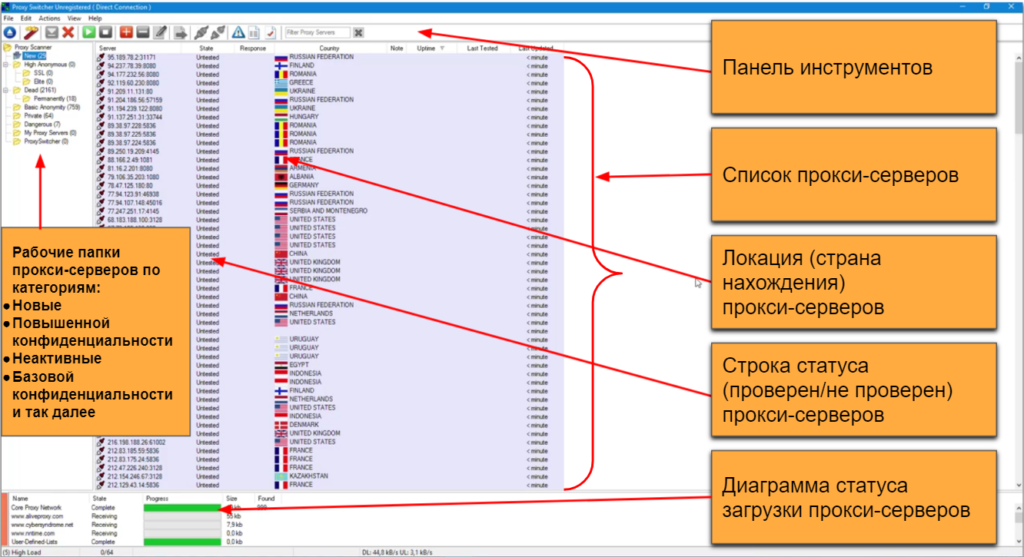
Preparing Proxy Switcher for Operation
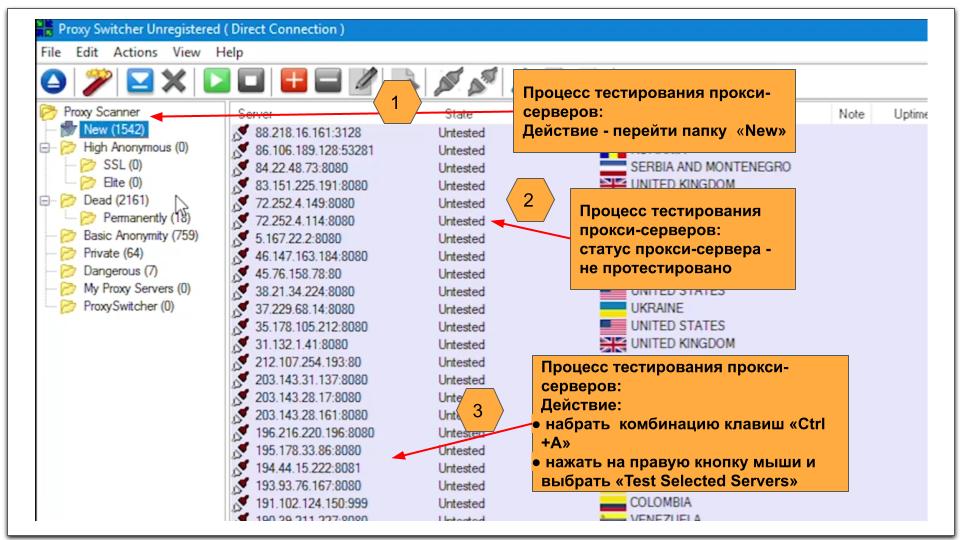
Go to folder "New» on the sidebar. All proxies in this folder have not yet been tested for relevance.
To start the process you need:
- Press the key combination (“Ctrl + A”) (Select the entire list);
- After selecting the entire list, right-click on the mouse and select the "Test Selected Servers" command.
Step Four
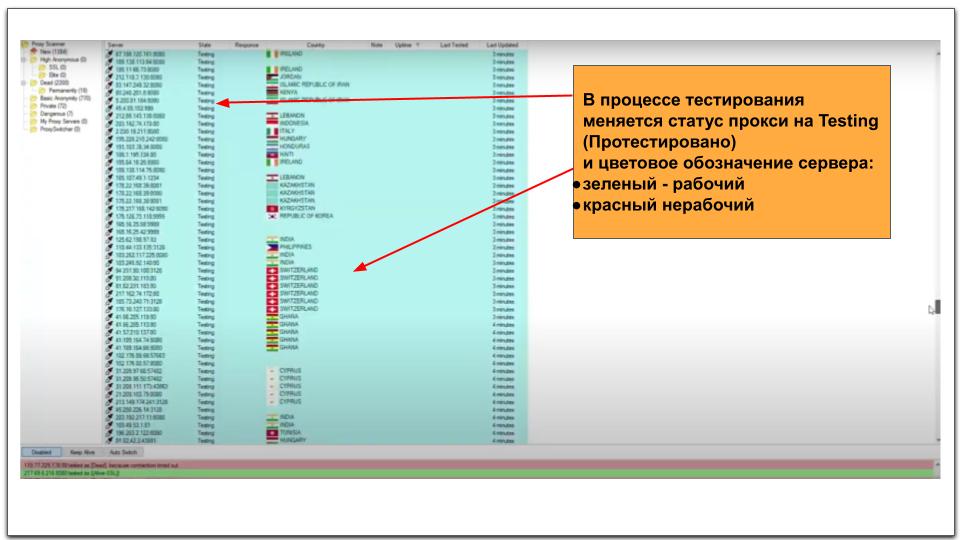
During testing, the proxy status changes from Untested (Not tested) to Testing (Tested).
The color coding of the proxy is also changed:
- Working servers are highlighted in green;
- Red - non-working (Dead), they are transferred to a folder with the same name.
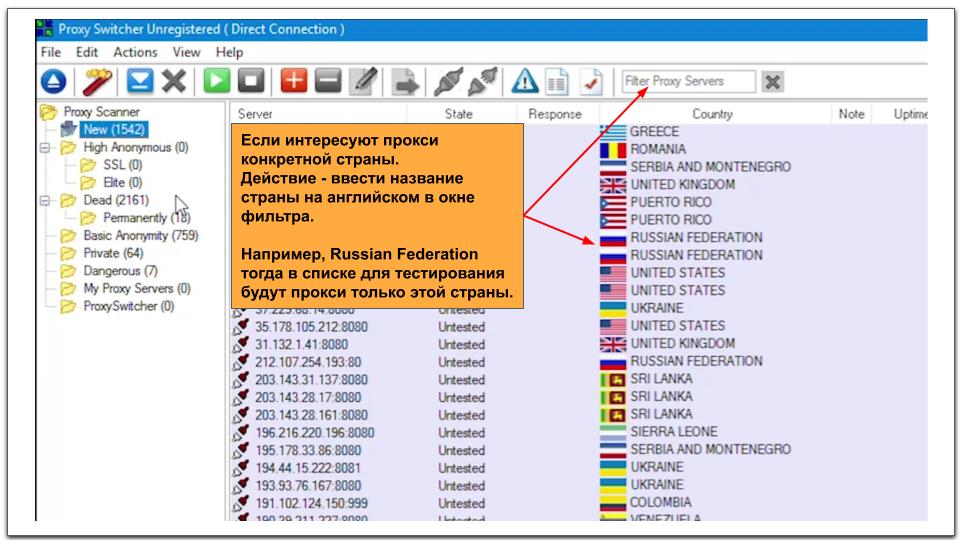
Attention! You can filter proxies for specific countries. To do this, in the filter window (located on the Toolbar at the top right), you need to enter the name of the state in English.
Step Five
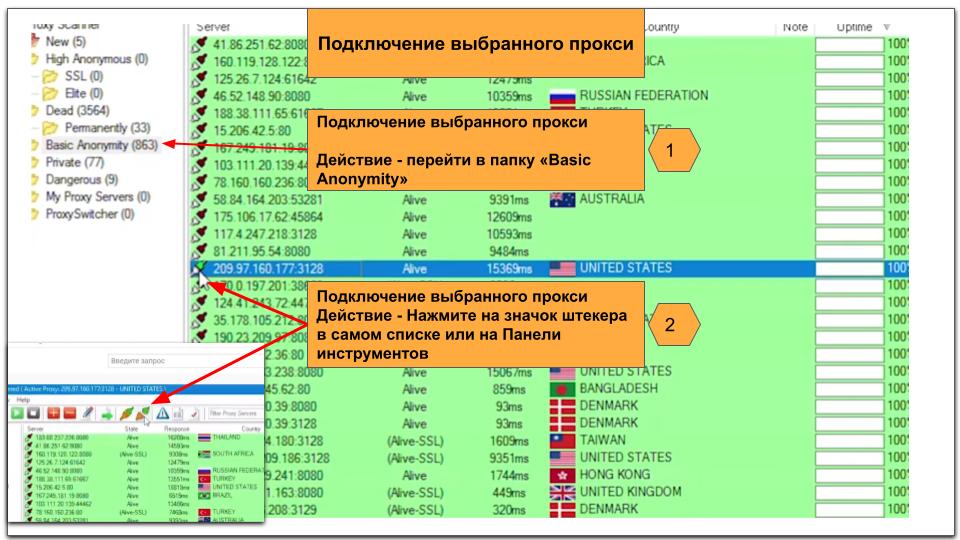
To work with actual proxies, go to the folder "Basic Anonymity" (Basic anonymity). To connect to a proxy, click on the icon "Plug» at the beginning of the proxy service line, or to a similar one in the Toolbar.
Plug and socket connected together — a connection is made to the proxy server. Click on the icon to terminate the session. "Plug» again or on "Disconnected Plug" on the Toolbar.
Step Six
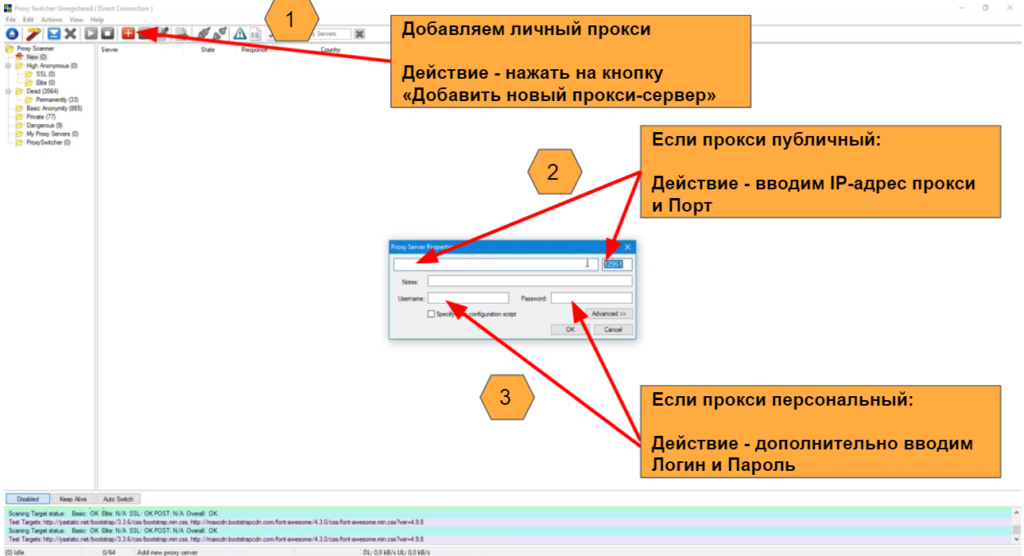
Adding a personal proxy. On the toolbar, click the icon "Cross» (Add new proxy):
- If the proxy is public: set the IP address and port;
- If the proxy is personal (premium): additionally enter your login and password.
After the appearance of the proxy server in the list, the testing phase begins. To do this, right-click on the proxy and select "Test this Server" (Check this server). 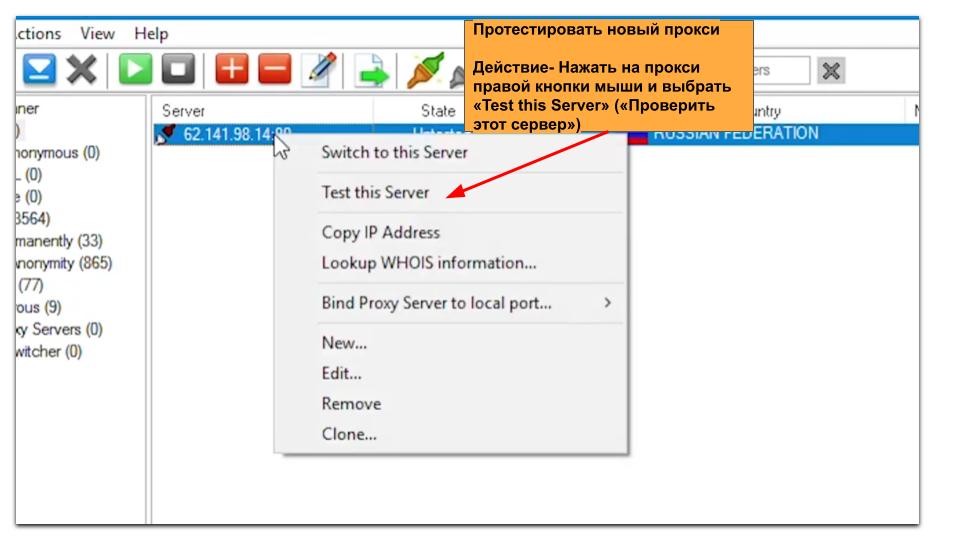
If everything is in order, the proxy is moved to the “Basic Anonymity” folder and further work with it is carried out as described in the previous steps. If a proxy is rejected, it is moved to the Dead folder.
It is important to understand that Proxy Switcher finds only free proxies that are on the Internet and are available to absolutely everyone. Such proxies do not guarantee the user's security, and also use protocols through which data can be leaked. If you use a proxy not for simple surfing, but for example for multi-accounting, then we recommend using paid analogues.


This way you will get secure protocols, “clean” IP addresses and stable servers that will provide anonymity 24 hours a day.
Proxy switcher great in cases where you need to set up an anonymous connection through various applications. With the help of the program, you can proxy the traffic of all programs on the operating system in the system, as well as individual elements. Automatic detection of working proxies is suitable for simple cases when you need to access a site with regional restrictions or temporarily hide the real IP address.
We hope that this instruction helped you configure the Proxy Switcher application, debug or change proxy settings using it.